
| 일 | 월 | 화 | 수 | 목 | 금 | 토 |
|---|---|---|---|---|---|---|
| 1 | 2 | 3 | 4 | 5 | ||
| 6 | 7 | 8 | 9 | 10 | 11 | 12 |
| 13 | 14 | 15 | 16 | 17 | 18 | 19 |
| 20 | 21 | 22 | 23 | 24 | 25 | 26 |
| 27 | 28 | 29 | 30 |
- 센토스
- qunit
- IOS
- PYTHON
- webpack
- Android
- TensorFlow
- xcode
- 티스토리챌린지
- MachineLearning
- unittest
- 맥
- ReactNative
- linux
- 네트워크
- node
- 오블완
- androidstudio
- react
- jest
- 개발
- localserver
- Chrome
- VirtualBox
- centos
- build
- MAC
- 리눅스
- vsCode
- Today
- Total
목록전체 글 (490)
로메오의 블로그
 [공지] 리딤 코드(프로모션코드) 받아가세요~
안녕하세요. 제 블로그에 방문해주시는 분들에게 항상 감사하는 마음을 가지고 있습니다. 이번에 제가 React Native로 소소한 앱을 하나 개발 했습니다. 유료앱인데 아래의 프로모션 코드로 무료로 설치해보시고 피드백 부탁드릴게요. 별점과 댓글도 부탁드립니다. 감사합니다. Android는 결제계정에 문제가 있어서 약간 시간이 더 걸릴거 같습니다. Android도 올라가면 공유드리겠습니다. 시트계산기 iOS용 iOS 프로모션 코드 사용방법 iOS 코드 (50개) MYL39NFKHL77 9A3E66A6NEHF 3NJMPEJAEARA H4Y7J7RW7KTA NEJFWTM6AWFL E4EXPRNWRK9A HH963JHHP4T9 3YH44E7NEX9E LL6N9PWRANK7 RR9PEWWWY7AT NFWHH6YA..
 [React Native] Google Play 개발자 등록
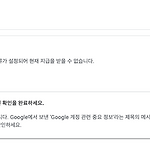
React 목록 결제계정의 지급보류 갑자기 Google Play 개발자 등록이라니.. 난 $ 25를 지불하고 Google Play 개발자에 등록이 되어 있습니다. 언젠가 Google Play Console에 결제 계정에 지급 보류가 걸렸습니다. 본인 신원 확인 절차를 거쳐야 한다고 하네요. Google 고객센터에 문의해서 신원 확인 메일을 전달 받았습니다. 본인 확인을 하기 위해 양식을 채우는데 업체유형이 1인 기업을 선택하니 인증되지 않는다고 하네요. 한참 찾아보니 처음에 개발자 등록할때 개인사업자로 등록했는데 이걸 개인으로 등록했어야 한다고 합니다. 언젠가 구글에서 정책을 바꾼거 같습니다. 그런데 업체유형은 변경이 되지 않아서 새로 개발자 계정을 파야되는 어의없는 상황이..-_- 하늘같은 구글스승이 ..
 [React Native] 프로모션 코드 발급하기 [iOS 기준]
React 목록 https://appstoreconnect.apple.com/ 서비스 > 프로모션 코드에서 수량을 입력하고 코드 생성 합니다. 1. 최대 100개의 코드를 생성할 수 있습니다. 2. 코드의 유통기한은 4주입니다. 3. 앱을 업데이트하면 기존 코드를 사용할 수 없습니다. 4. 앱 업데이트시 50개를 추가 발매 할 수 있습니다. 기록에서 생성한 코드를 확인 할 수 있습니다. 본인의 이메일로도 txt 파일로 전송됩니다. React 목록
 [React Native] 프로모션 코드 사용하기 [iOS 기준]
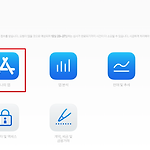
React 목록 프로모션 코드 사용하기 앱 스토어를 실행하고 앱 탭을 클릭합니다. 스크롤을 제일 아래로 내리고 코드 교환을 누릅니다. 수동으로 코드 입력을 누릅니다. 프로모션 코드를 입력하고 코드 교환 버튼을 누릅니다. 앱이 다운로드됩니다. 이제 앱을 사용할 수 있습니다. React 목록
 [React Native] 앱 배포하기 iOS & Android
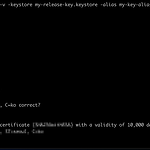
React 목록 Android keystore 생성 $ keytool -genkey -v -keystore my-release-key.keystore -alias my-key-alias -keyalg RSA -keysize 2048 -validity 10000 MYAPP_RELEASE_STORE_FILE=xxx.keystore MYAPP_RELEASE_KEY_ALIAS=xxx MYAPP_RELEASE_KEY_PASSWORD=xxx MYAPP_RELEASE_STORE_PASSWORD=xxx versionCode와 versionName을 확인 합니다. signingConfigs { release { if (project.hasProperty('MYAPP_RELEASE_STORE_FILE')) { storeF..
 [React Native] Firebase 연동하기 (2022년 기준)
Firebase 목록 React 목록 Firebase 프로젝트 생성 Android 연동 안내에 따라 build.gradle을 수정하고 sync 합니다. app을 재실행하고 Analytics Dashboard에서 접속을 확인합니다. iOS 연동 https://github.com/firebase/firebase-ios-sdk 패키지를 추가합니다. FirebaseAnalytics를 선택하고 추가합니다. AppDelegate.mm 파일에 두개를 import 합니다. 위 코드도 추가합니다. iOS App을 실행하면 연동을 확인 할 수 있습니다. Firebase 목록 React 목록
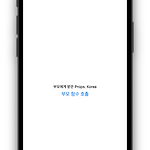
 [React Native] app아이콘, Splash 이미지 만들기 - react-native-make
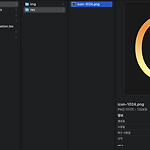
React 목록 react-native-make 설치 $ npm install --save-dev @bam.tech/react-native-make App 아이콘 1024 * 1024 사이즈의 png 이미지로 아이콘을 준비합니다. $ npx react-native set-icon --path ./src/assets/res/icon-1024.png --background "#191919" Android와 ios에 아이콘이 사이즈 별로 생성되었습니다. Splash 이미지 $ npx react-native set-splash --path ./src/assets/res/launchImage.png --resize center --background "#191919" android와 ios에 사이즈별 splash..
 [React Native] async-storage
React 목록 async-storage 설치 $ npm install @react-native-async-storage/async-storage App.tsx import React, {useEffect, useState} from 'react'; import { View, SafeAreaView, StatusBar, Text, TouchableOpacity, StyleSheet, } from 'react-native'; import AsyncStorage from '@react-native-async-storage/async-storage'; type Nation = { nation: string; company: string; }; const App = () => { const [list, setL..
PYTHON 차례 requests 설치 $ pip install requests call.py import requests def call(): headers = { 'Content-Type' : 'application/x-www-form-urlencoded' } payload = { 'id': 'foo', 'name': 'bar' } url = 'https://domain.com' response = requests.post(url, headers=headers, data=payload) print(response) call() 코드 실행 $ python3 call.py PYTHON 차례
PYTHON 차례 interval.py import threading def set_interval(func, sec): def func_wrapper(): set_interval(func, sec) func() t = threading.Timer(sec, func_wrapper) t.start() return t seq = 1 def interval_func(): global seq seq = seq + 1 print('interval: ' + str(seq)) set_interval(interval_func, 3) 코드 실행 $ python3 interval.py PYTHON 차례
 [React Native] 디버그 [Chrome DevTools & Safari]
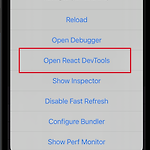
React 목록 Chrome DevTools 설정 react-native ios에서 command + d를 누르고 Open React DevTools를 선택하면 아래의 오류가 발생합니다. error Browser exited with error:, Error: invalid url, missing http/https protocol React Native가 사용하는 Hermes 엔진을 크롬에서 직접 설정해 줘야합니다. 크롬에서 DevTools 디버깅하기 크롬에서 chrome://inspect/ 에 접속합니다. Configure를 누르고 localhost:8081을 추가합니다. 여러개의 Hermes가 표시되는 이 중 하나입니다. ㅋ inspect를 누릅니다. DevTools에서 console을 확인 할 수..
 [React Native] Redux toolkit & Todo App
React 목록 App.tsx import React from 'react'; import {SafeAreaView, StatusBar} from 'react-native'; import {Provider} from 'react-redux'; import {store} from './src/redux/store'; import TodoHeader from './src/components/TodoHeader'; import TodoList from './src/components/TodoList'; const App = () => { const RootApp = () => { return ( ); }; return ( ); }; export default App; store.ts import {config..
 [React Native] Redux toolkit & Network call
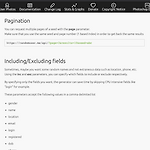
React 목록 https://randomuser.me/documentation#pagination Api 더미 데이터는 위 사이트에서 가져옵니다. App.tsx import React from 'react'; import {SafeAreaView, StatusBar} from 'react-native'; import {Provider as ReduxProvider} from 'react-redux'; import UserList from './UserList'; import store from './store'; const App = () => { return ( ); }; export default App; store.ts import {combineReducers, configureStore} fr..
 [React Native] Redux toolkit
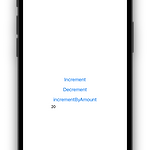
React 목록 설치 $ npm install @reduxjs/toolkit counter.ts $ mkdir src/redux $ touch src/redux/counter.ts import {createSlice} from '@reduxjs/toolkit'; import type {PayloadAction} from '@reduxjs/toolkit'; export interface CounterState { count: number; } const initialState: CounterState = { count: 0, }; export const counterSlice = createSlice({ name: 'counter', initialState, reducers: { increment: sta..
 [React Native] Draggable FlatList
React 목록 프로젝트 생성 $ npx react-native init dragableList --template react-native-template-typescript React Native Reanimated 설치 $ npm install --save react-native-reanimated babel.config.js module.exports = { presets: ['module:metro-react-native-babel-preset'], plugins: ['react-native-reanimated/plugin'], }; plugins에 react-native-reaminated/plugin을 추가합니다. react-native-gesture-handler 설치 $ npm instal..
 [React Native] props
React 목록 App.tsx import React from 'react'; import {View, StyleSheet} from 'react-native'; import ChildScreen from './src/screens/ChildScreen'; const App = () => { const company = [ { country: 'Korea', company: 'Samsung', }, { country: 'USA', company: 'Apple', }, { country: 'Japan', company: 'Sony', }, ]; // 자식으로부터 호출됨 const onCalled = (param: string) => { console.log(param); }; return ( ); }; e..
 [React Native] custom font 설정
React 목록 구글 Noto KR 폰트 다운로드 https://fonts.google.com/noto/specimen/Noto+Sans+KR Download family 로 폰트 다운로드합니다. StyleSheet에 적용 import { View, Text, StyleSheet } from 'react-native'; ... const HomeScreen = () => { ... return ( C ); }; export default HomeScreen; const styles = StyleSheet.create({ ... keypadNumber: { ... fontFamily: 'Noto Sans KR', }, ... }); font를 인지하지 못합니다. iOS 폰트 설정 $ mkdir src/io..
 [React Native] redux
React 목록 모듈 설치 $ npm install redux $ npm install react-redux $ npm install redux-thunk 파일 생성 $ mkdir src $ mkdir src/redux $ mkdir src/screens $ touch src/redux/actions.tsx $ touch src/redux/reducer.tsx $ touch src/redux/store.tsx $ touch src/screen/HomeScreen.tsx $ touch src/screen/ChildScreen.tsx store.tsx import {legacy_createStore, combineReducers, applyMiddleware} from 'redux'; import thunk..
 [React Native] scrollview
React 목록 import React, {useState} from 'react'; import {View, Text, StyleSheet, Button, ScrollView} from 'react-native'; interface State { name: string; } export default function App() { const [companies, setCompany] = useState([ {name: 'google'}, {name: 'samsung'}, {name: 'microsoft'}, {name: 'facebook'}, {name: 'apple'}, ]); const add = () => { const newCompany = {name: 'newCompany'}; setCompa..
 [React Native] useState
React 목록 import React, {useState} from 'react'; import {View, Text, StyleSheet, Button} from 'react-native'; interface State { age: number; } export default function App() { const [count, setCount] = useState({age: 0}); const increase = () => { setCount({age: count.age + 1}); }; const descease = () => { setCount({age: count.age - 1}); }; return ( {count.age} ); } const styles = StyleSheet.create..