
반응형
Notice
Recent Posts
Recent Comments
Link
| 일 | 월 | 화 | 수 | 목 | 금 | 토 |
|---|---|---|---|---|---|---|
| 1 | 2 | 3 | 4 | |||
| 5 | 6 | 7 | 8 | 9 | 10 | 11 |
| 12 | 13 | 14 | 15 | 16 | 17 | 18 |
| 19 | 20 | 21 | 22 | 23 | 24 | 25 |
| 26 | 27 | 28 | 29 | 30 | 31 |
Tags
- ReactNative
- 티스토리챌린지
- 센토스
- unittest
- 맥
- Chrome
- node
- androidstudio
- MAC
- fastapi
- localserver
- pydantic
- react
- 리눅스
- webpack
- MachineLearning
- linux
- vsCode
- TensorFlow
- VirtualBox
- Android
- PYTHON
- 개발
- centos
- xcode
- IOS
- 오블완
- 네트워크
- build
Archives
- Today
- Total
로메오의 블로그
[React Native] Android Call Log 통화내역 가지고 오기 본문
반응형
프로젝트 생성
$ react-native init firstProject
$ cd firstProject
react-native-call-log 설치
$ npm install --save react-native-call-log
$ react-native link react-native-call-log
AndroidManifest.xml
<manifest xmlns:android="http://schemas.android.com/apk/res/android"
  package="com.firstproject">

    <uses-permission android:name="android.permission.INTERNET" />
    <uses-permission android:name="android.permission.READ_CALL_LOG" />

    <application
      android:name=".MainApplication"
      android:label="@string/app_name"
      android:icon="@mipmap/ic_launcher"
      android:roundIcon="@mipmap/ic_launcher_round"
      android:allowBackup="false"
      android:theme="@style/AppTheme">
      <activity
        android:name=".MainActivity"
        android:label="@string/app_name"
        android:configChanges="keyboard|keyboardHidden|orientation|screenSize"
        android:windowSoftInputMode="adjustResize">
        <intent-filter>
            <action android:name="android.intent.action.MAIN" />
            <category android:name="android.intent.category.LAUNCHER" />
        </intent-filter>
      </activity>
      <activity android:name="com.facebook.react.devsupport.DevSettingsActivity" />
    </application>

</manifest>
AndroidManifest.xml 파일에 READ_CALL_LOG permission을 추가합니다.
App.js
import React, { Component } from 'react';
import { PermissionsAndroid, StyleSheet, Text, View } from 'react-native';
import CallLogs from 'react-native-call-log'

export default class App extends Component {

    componentDidMount = async () => {
        try {
            // 권한을 요청한다.
            const granted = await PermissionsAndroid.request(
                PermissionsAndroid.PERMISSIONS.READ_CALL_LOG,
                {
                    title: 'Call Log 예제',
                    message: 'call logs 엑세스 허용하시겠습니까?',
                    buttonNeutral: '나중에 물어보기',
                    buttonNegative: '아뇨',
                    buttonPositive: '예',
                }
            )
            if (granted === PermissionsAndroid.RESULTS.GRANTED) {

                // call log를 가지고 온다.
                CallLogs.load(5).then(callLog => {
                    console.log(callLog)
                });
            } else {
                console.log('Call Log permission denied');
            }
        }
        catch (e) {
            console.log(e);
        }
    }

    render() {
        return (
            <View style={styles.container}>
                <Text style={styles.welcome}>Welcome to React Native!</Text>
            </View>
        );
    }
}

const styles = StyleSheet.create({
    container: {
        flex: 1,
        justifyContent: 'center',
        alignItems: 'center',
        backgroundColor: '#F5FCFF',
    },
    welcome: {
        fontSize: 20,
        textAlign: 'center',
        margin: 10,
    },
});
App Build
$ react-native start --reset-cache

## 새 terminal을 열어서
$ react-native run-android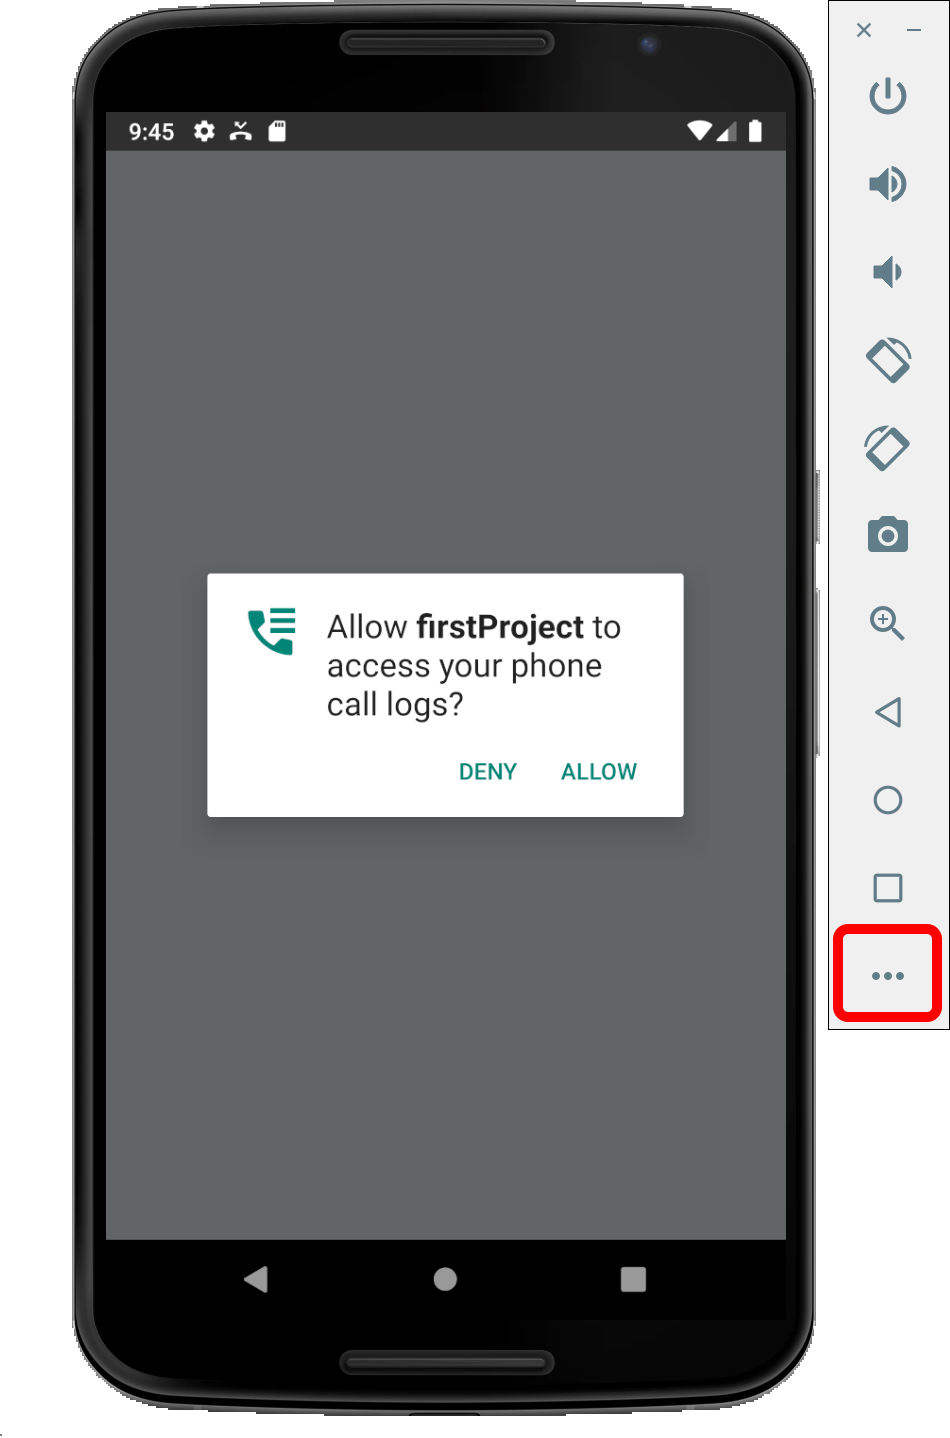
Android Emulator 설정 버튼을 누릅니다.
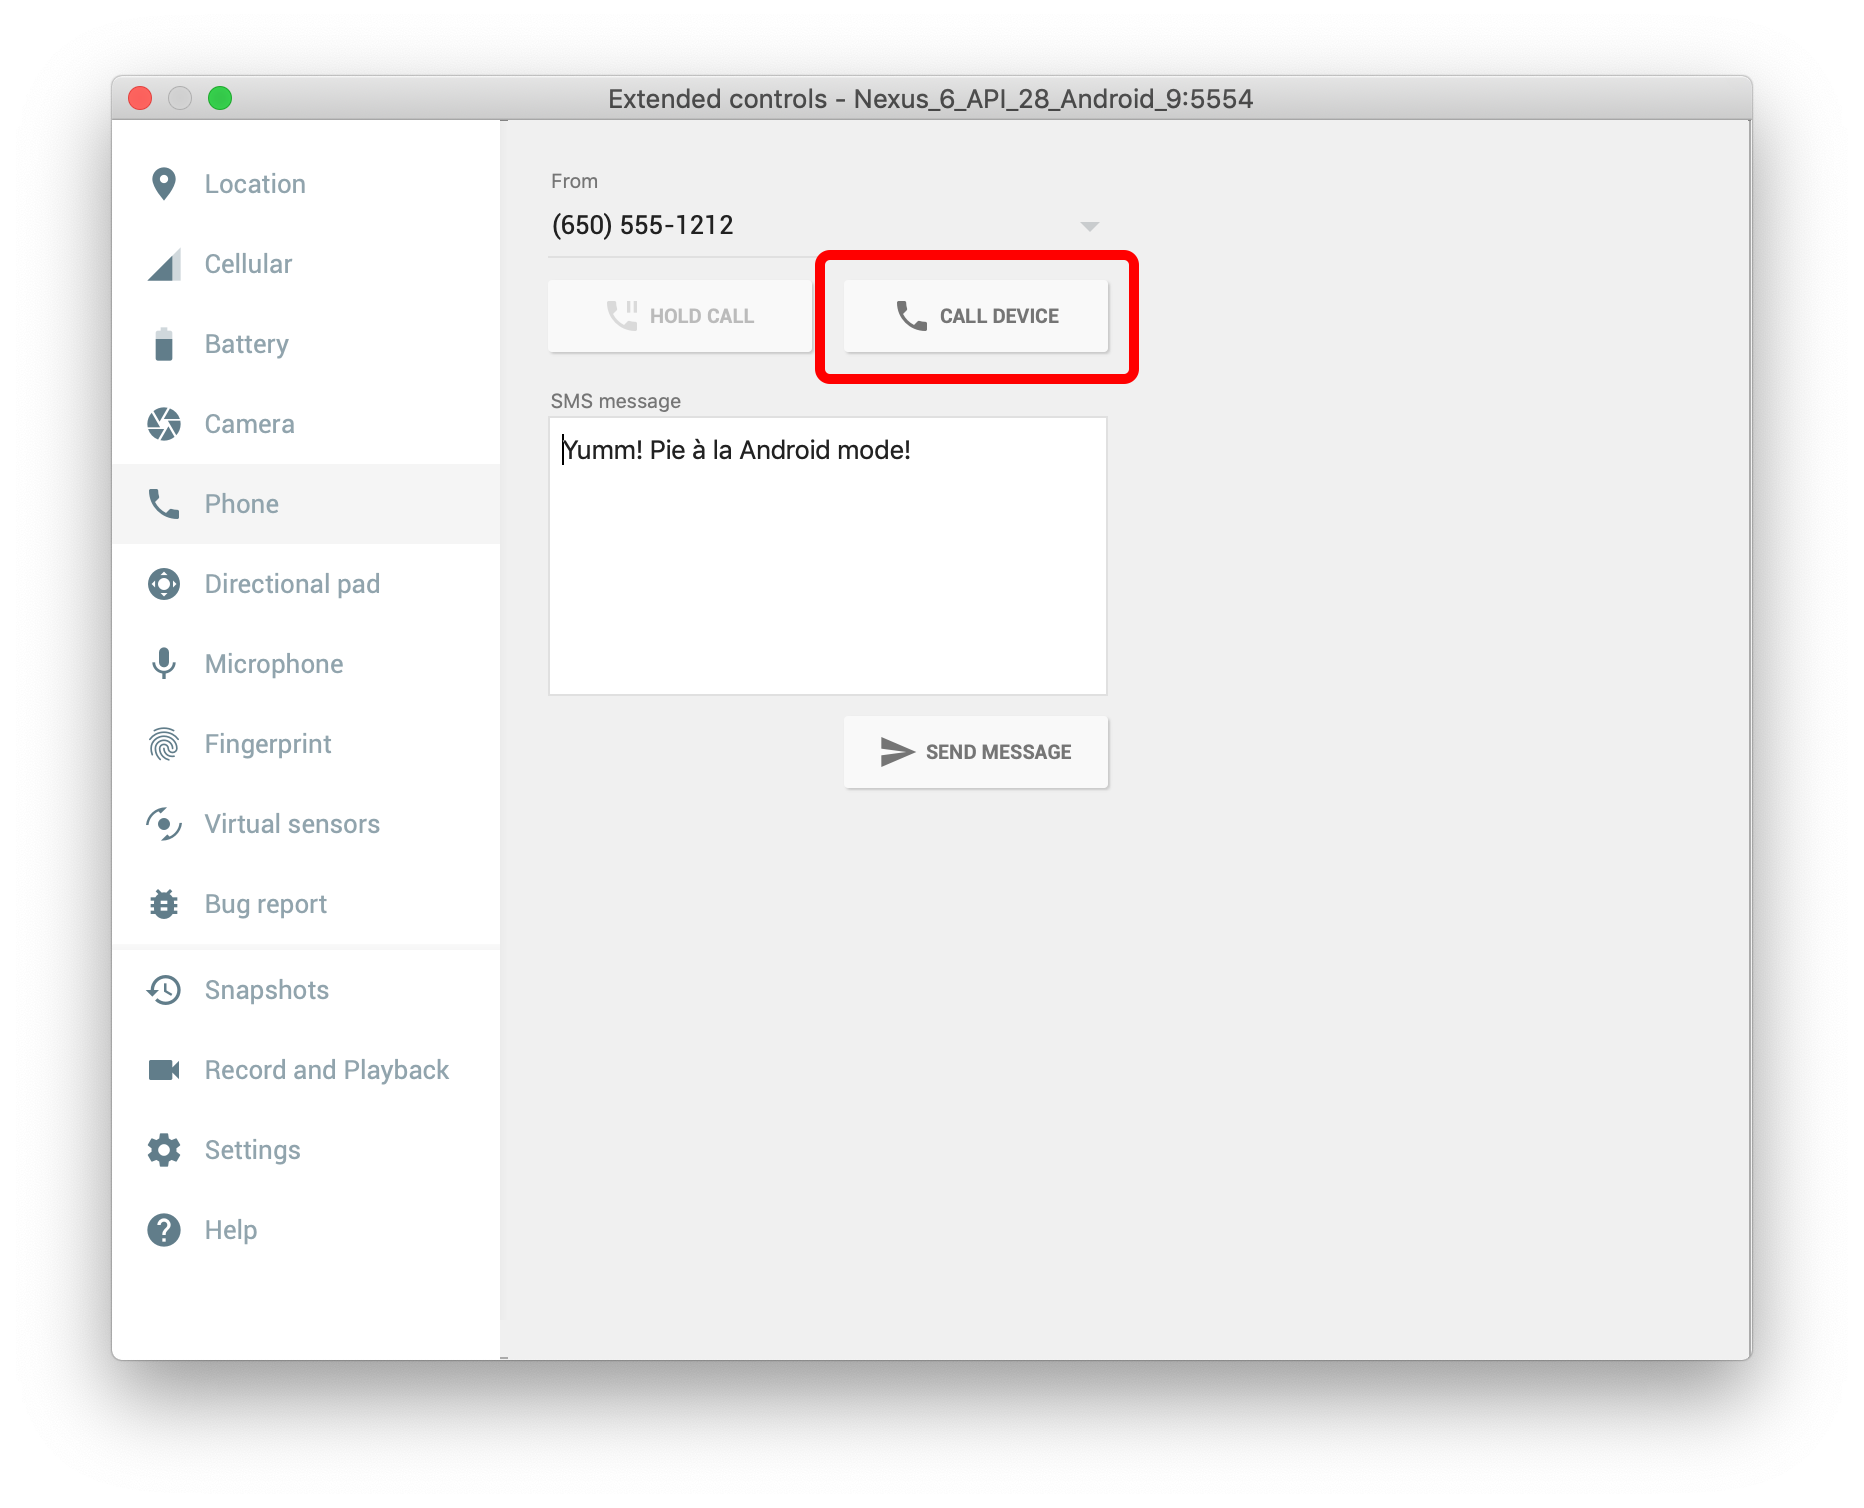
Phone 메뉴에서 CALL DEVICE 버튼을 몇 번 눌러줍니다.
설정 창을 닫고 화면에서 Permission Allow를 누릅니다.

키보드 Command + M (Windows는 Ctrl + M)을 누르고 Debug JS Remotely 를 누릅니다.
크롬 디버그창이 열리고 Console창에서 로그를 확인 할 수 있습니다.
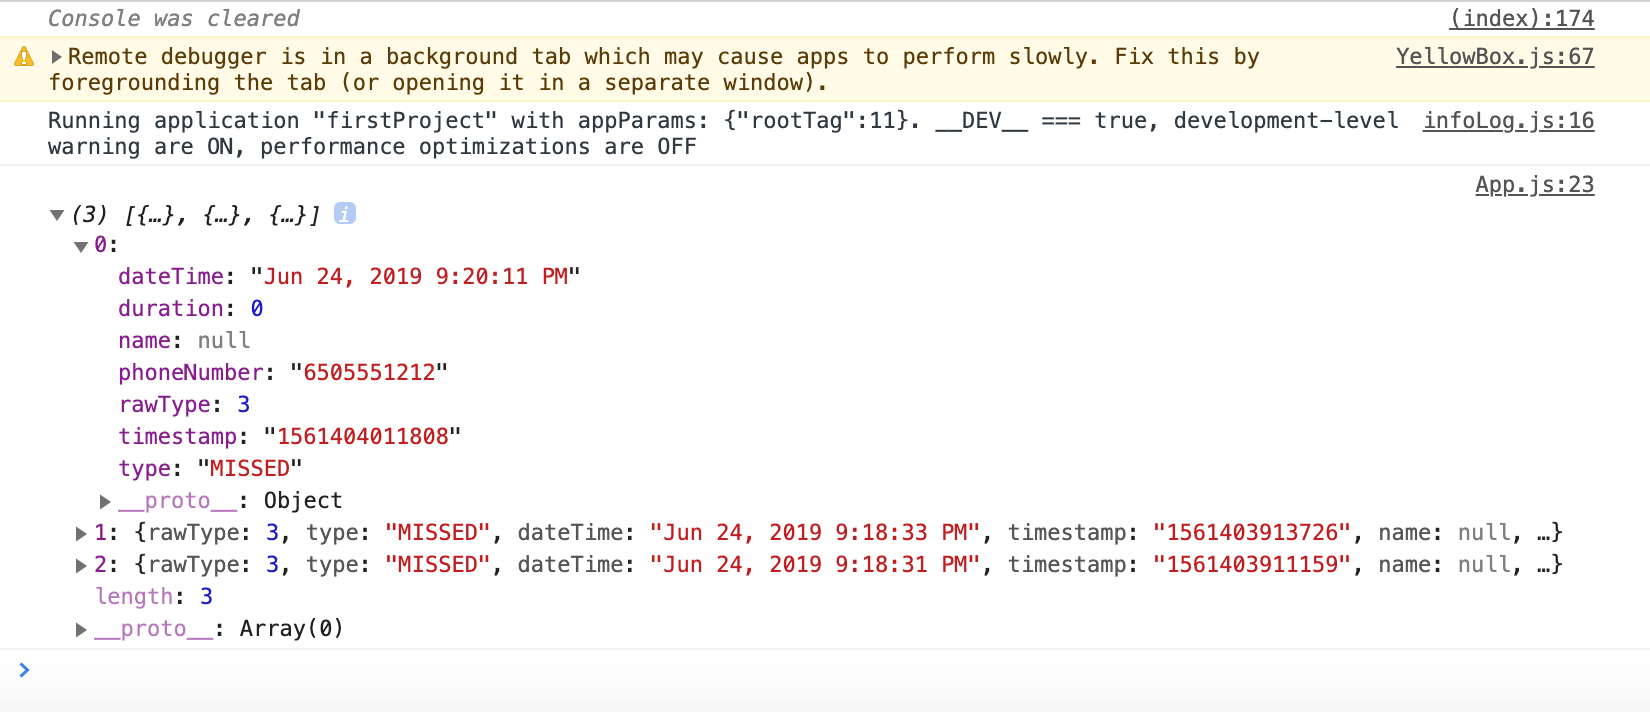
CallLogs.load(5).then(callLog => {
    console.log(callLog)
});
위처럼 CallLogs.load(5)는 갯수를 정해서 call log를 가지고 올 수 있고,
CallLogs.loadAll().then(callLog => {
    console.log(callLog)
});
CallLogs.loadAll()은 전체 CallLog를 가지고 올 수 있습니다.
반응형
'App & OS > Hybrid' 카테고리의 다른 글
| [React Native] 패키지명, 번들명 변경하기 Package, Bundle [Android, iOS] (0) | 2019.07.06 |
|---|---|
| [Expo] iOS/Android 디바이스로 build 하기 (0) | 2019.07.01 |
| [React Native] Tab navigation 사용하기 (2019년 기준) (0) | 2019.06.23 |
| [React Native] Stack navigation 코드 분리하기 (0) | 2019.06.23 |
| [React Native] Stack navigation 사용하기 (2019년 기준) (0) | 2019.06.23 |
'App & OS/Hybrid' Related Articles
more


Comments