반응형
Notice
Recent Posts
Recent Comments
Link
| 일 | 월 | 화 | 수 | 목 | 금 | 토 |
|---|---|---|---|---|---|---|
| 1 | 2 | 3 | 4 | 5 | 6 | 7 |
| 8 | 9 | 10 | 11 | 12 | 13 | 14 |
| 15 | 16 | 17 | 18 | 19 | 20 | 21 |
| 22 | 23 | 24 | 25 | 26 | 27 | 28 |
Tags
- 리눅스
- IOS
- xcode
- MAC
- linux
- ReactNative
- build
- react
- 오블완
- 네트워크
- MachineLearning
- androidstudio
- localserver
- vsCode
- Android
- Chrome
- fastapi
- 개발
- node
- centos
- TensorFlow
- webpack
- 티스토리챌린지
- 센토스
- 맥
- PYTHON
- unittest
- pydantic
- VirtualBox
Archives
- Today
- Total
로메오의 블로그
[Ionic] QR Code 생성하기 / QR Code Scan 본문
반응형
프로젝트 생성
$ ionic start qrReader blank
$ cd qrReader
$ npm install ngx-qrcode2
플러그인 설치
$ ionic cordova plugin add phonegap-plugin-barcodescanner
$ npm install @ionic-native/barcode-scanner
$ ionic cordova plugin add cordova-base64-to-gallery
$ npm install @ionic-native/base64-to-gallery
config.xml
<?xml version='1.0' encoding='utf-8'?>
<widget id="io.ionic.starter" version="0.0.1" xmlns="http://www.w3.org/ns/widgets" xmlns:cdv="http://cordova.apache.org/ns/1.0">
    ....
    <platform name="android">
        ....
    </platform>
    <platform name="ios">
        <edit-config file="*-Info.plist" mode="merge" target="NSCameraUsageDescription">
            <string>To Scan QR Code</string>
        </edit-config>
        <edit-config file="*-Info.plist" mode="merge" target="NSPhotoLibraryAddUsageDescription">
            <string>To Save QR Code</string>
        </edit-config>
        ....
    </platform>
    ....
</widget>
ios에 카메라와 사진보관함에 접근할 때 사용할 메세지를 등록합니다.
src/app/app.module.ts
....
import { BarcodeScanner } from '@ionic-native/barcode-scanner/ngx'
import { Base64ToGallery } from '@ionic-native/base64-to-gallery/ngx'

@NgModule({
  ....
  providers: [
    ....
    BarcodeScanner,
    Base64ToGallery
  ],
  ....
})
....
import { NgModule } from '@angular/core';
import { BrowserModule } from '@angular/platform-browser';
import { RouteReuseStrategy } from '@angular/router';

import { IonicModule, IonicRouteStrategy } from '@ionic/angular';
import { SplashScreen } from '@ionic-native/splash-screen/ngx';
import { StatusBar } from '@ionic-native/status-bar/ngx';

import { AppComponent } from './app.component';
import { AppRoutingModule } from './app-routing.module';

import { BarcodeScanner } from '@ionic-native/barcode-scanner/ngx'
import { Base64ToGallery } from '@ionic-native/base64-to-gallery/ngx'

@NgModule({
  declarations: [AppComponent],
  entryComponents: [],
  imports: [BrowserModule, IonicModule.forRoot(), AppRoutingModule],
  providers: [
    StatusBar,
    SplashScreen,
    { provide: RouteReuseStrategy, useClass: IonicRouteStrategy },
    BarcodeScanner,
    Base64ToGallery
  ],
  bootstrap: [AppComponent]
})
export class AppModule {}
src/app/home/home.module.ts
....
import { NgxQRCodeModule } from 'ngx-qrcode2';

@NgModule({
  imports: [
    ....
    NgxQRCodeModule
  ],
  ....
})
....
import { NgModule } from '@angular/core';
import { CommonModule } from '@angular/common';
import { IonicModule } from '@ionic/angular';
import { FormsModule } from '@angular/forms';
import { RouterModule } from '@angular/router';
import { HomePage } from './home.page';
import { NgxQRCodeModule } from 'ngx-qrcode2';
@NgModule({
imports: [
CommonModule,
FormsModule,
IonicModule,
RouterModule.forChild([
{
path: '',
component: HomePage
}
]),
NgxQRCodeModule
],
declarations: [HomePage]
})
export class HomePageModule {}
src/app/home/home.page.html
<ion-header>
  <ion-toolbar color="primary">
    <ion-title>
      Ionic Blank
    </ion-title>
  </ion-toolbar>
</ion-header>

<ion-content>

  <ion-item>
    <ion-input type="text" placeholder="My QR Code Data" [(ngModel)]="qrData"></ion-input>
  </ion-item>

  <ion-segment [(ngModel)]="elementType">
    <ion-segment-button value="canvas">
      <ion-label>Canvas</ion-label>
    </ion-segment-button>
    <ion-segment-button value="img">
      <ion-label>Image</ion-label>
    </ion-segment-button>
    <ion-segment-button value="url">
      <ion-label>URL</ion-label>
    </ion-segment-button>
  </ion-segment>

  <ion-button expand="full" (click)="scanQRCode()" color="secondary">
    <ion-icon name="qr-scanner"></ion-icon> Scan Code
  </ion-button>

  <ion-card *ngIf="qrData" text-center>
    <ngx-qrcode [qrc-value]="qrData" [qrc-element-type]="elementType" qrc-class="my-code"></ngx-qrcode>
    <ion-card-content>
      <ion-button expand="full" color="tertiary" (click)="downloadQR()" *ngIf="elementType === 'canvas'">
        <ion-icon name="download" slot="start"></ion-icon> Download QR Code
      </ion-button>
    </ion-card-content>
  </ion-card>

  <ion-card *ngIf="scannedCode">
    <ion-card-content>
      Result from scan: {{ scannedCode }}
    </ion-card-content>
  </ion-card>

</ion-content>
src/app/home/home.page.ts
import { Component } from '@angular/core';
import { BarcodeScanner } from '@ionic-native/barcode-scanner/ngx';
import { Base64ToGallery } from '@ionic-native/base64-to-gallery/ngx';
import { ToastController } from '@ionic/angular';

@Component({
  selector: 'app-home',
  templateUrl: 'home.page.html',
  styleUrls: ['home.page.scss'],
})
export class HomePage {

  qrData = 'http://gaeyou.com'
  scanCode = null
  elementType: 'url' | 'canvas' | 'img' = 'canvas'

  constructor(
    private barcodeScanner: BarcodeScanner,
    private base64ToGallery: Base64ToGallery,
    private toastCtrl: ToastController
  ) {}

  scanQRCode() {
    this.barcodeScanner.scan().then(barcodeData => {
      this.scanCode = barcodeData
    })
  }

  downloadQR() {
    const canvas = document.querySelector('canvas') as HTMLCanvasElement
    const imageData = canvas.toDataURL('image/jpeg').toString()
    console.log(imageData)

    let data = imageData.split(',')[1]

    this.base64ToGallery
        .base64ToGallery(data, {prefix: '_img', mediaScanner: true})
        .then(async res => {
          let toast = await this.toastCtrl.create({
            header: 'QR Code saved in your phone'
          })
          toast.present()
        }, err => console.log(err))
  }
}
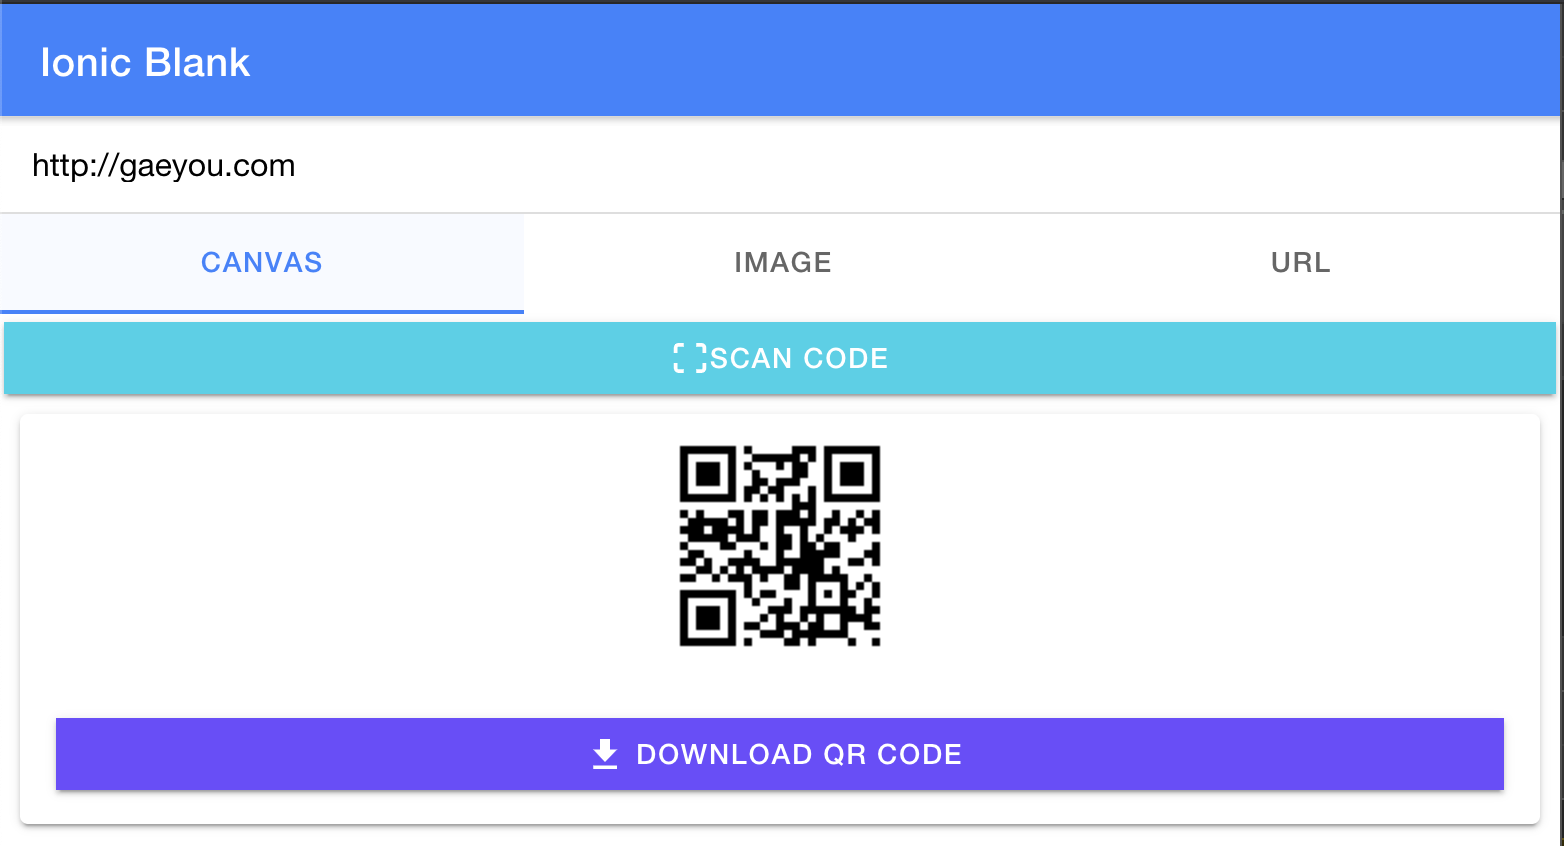
서버구동
$ ionic serve
iOS build
$ ionic cordova build iosXcode에서 프로젝트를 열어서 iPhone으로 빌드하고 QR Scan을 작동해봅니다.
반응형
'Frontend > angular' 카테고리의 다른 글
| [Ionic] net::ERR_CLEARTEXT_NOT_PERMITTED 오류 해결 - Android (0) | 2020.01.16 |
|---|---|
| [IONIC] iOS Status Bar font 색상 변경하기 (0) | 2020.01.16 |
| [IONIC] Modal Controller - 파라미터 전달 (0) | 2020.01.16 |
| [Angular] Angular Material 사용하기 (0) | 2020.01.15 |
| [Angular] ngx-translate 다국어 처리 (0) | 2020.01.14 |
Comments


